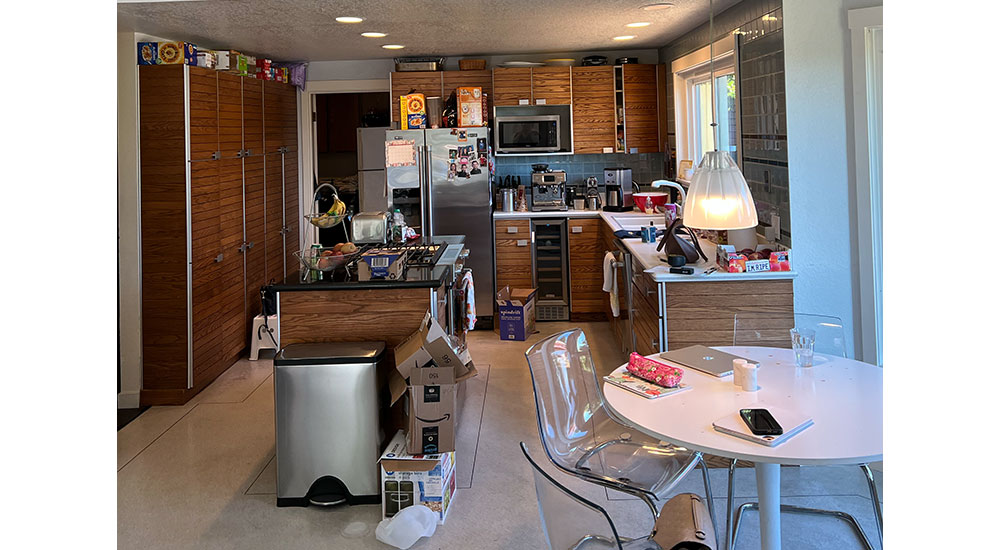
It takes a sizable kitchen with adequate pantry, prep and cooking space, as well as built-in efficiency, to regularly feed a family of five. But the existing one in this home in Lake Forest Park, Wash., was anything but: It lacked sufficient storage and counter space, as well as suitable refrigerator and freezer capacities, forcing the family to frequent an extra fridge inconveniently located in the garage. To address these and other problem areas in the house, the clients turned to a surprising source of inspiration: social media.
“They found us on Instagram and had been following us for a while,” said Emily Ruff, owner and principal designer of Cohesively Curated. Having seen and liked another project her studio completed in the same vicinity, they called on her to tackle their 1980s–era home.
A New Arrangement
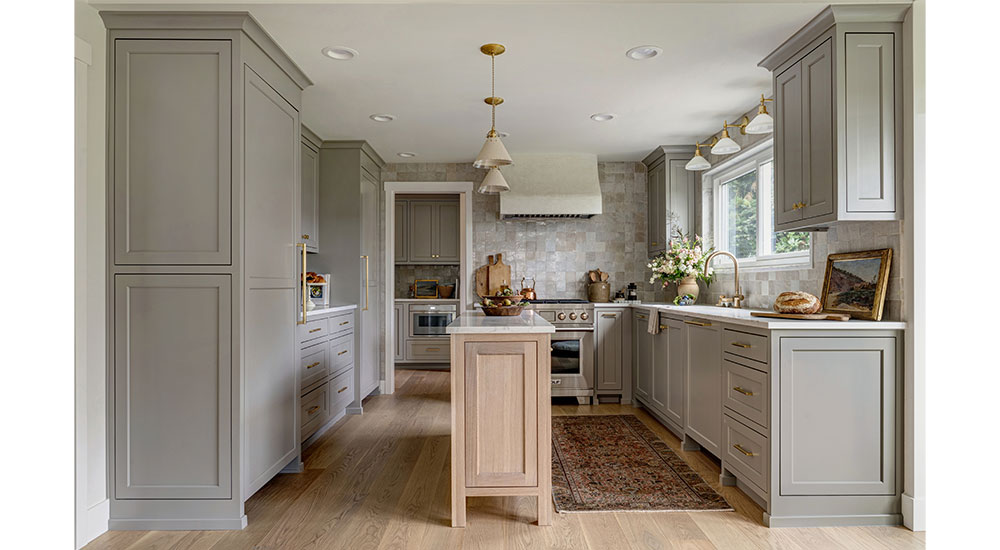
Stairs to one side of the kitchen and an exterior wall on the other prevented expansion of the existing kitchen’s footprint, so the design team had to make do within those constraints. The strategy was three-fold: First off, the designers rejiggered the appliances and replaced all the existing cabinetry. Previously, the cabinets on the wall backed by the staircase were awkwardly shallow because of placement of a laundry room entry at the back of the kitchen. By shifting the laundry room opening to a position 31 inches away from the staircase-backed wall and extending the latter by 36 inches, the designers were able to incorporate standard-depth cabinetry along this wall and have room enough to fit separate paneled refrigerator and freezer units.

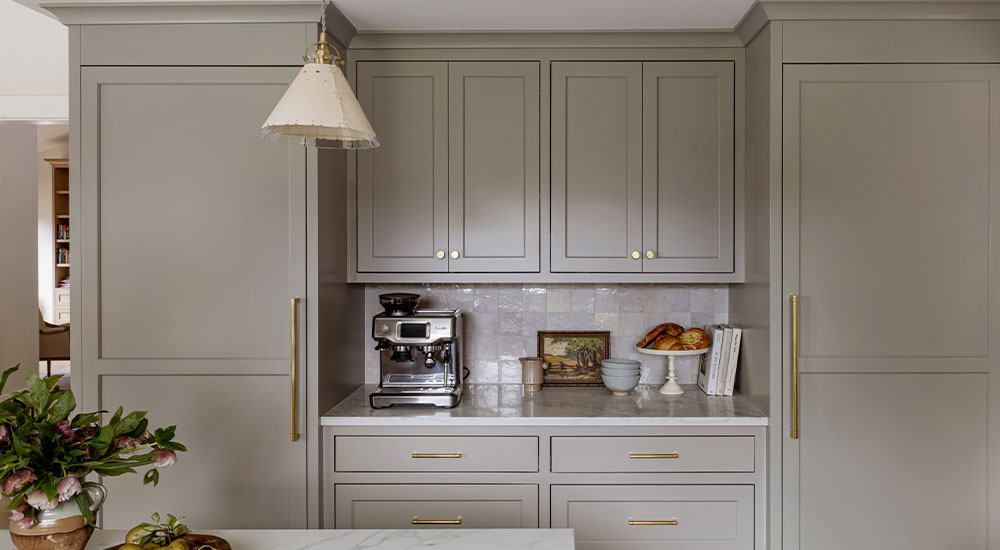
The new cabinets here and throughout the kitchen are full height, reclaiming eight inches of dead space that existed between the old casework and the ceiling, and finished in a warm gray to keep the look timeless. The countertops are Arabescato-simulating quartz, creamy beige zellige tiles were chosen for the backsplashes, and aged brass hardware enhances warmth.
The second part of the project involved reducing the island from 27 inches to a narrow 18 inches deep by removing the cooktop. The design team placed a new range on the back wall and fashioned a custom hood above.
“Regardless of the island size, people tend to gather around it, so our clients didn’t want any appliances there,” said Ruff.
Because there are lots of square elements in this area, the designer wanted to bring in some rounded ones, hence the shape of the hood – fabricated onsite and plaster-finished – with a curve on the bottom.
Meanwhile, the island was rebuilt in solid white oak, which injects a warm touch and matches the new floors laid throughout the house. It is also topped with Arabescato quartz and gives the impression of a freestanding piece of furniture. Its slim dimensions also afford ample walking space despite the addition of deep cabinetry and appliances.
The Butler Did It
As one of the clients hailed from Australia, where butler’s pantries are plenty common nowadays, both designer and client saw that adding such a room was the obvious solution to increasing storage and functionality. The laundry room behind the kitchen was the ideal spot for it, so the third move involved converting the space. After relocating laundry machines to a storage closet in the basement, as well as adding a more compact stacked washer/dryer set to the renovated master bedroom’s closet, the designers inserted an L-shaped configuration of cabinetry matching the kitchen, adding approximately 130 cubic feet of storage and a countertop for prep work. This area also holds the microwave, smaller appliances and a secondary sink.
Setting Boundaries
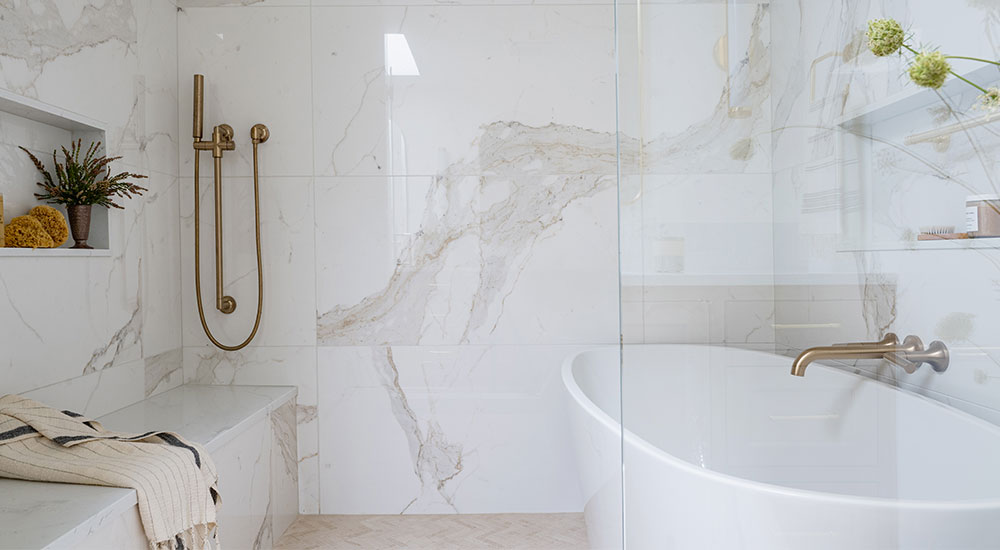
All the home’s bathrooms were in dire need of renovation, too, but none more so than the master bath, which Ruff said was a very odd and dysfunctional layout. The bathtub and shower were in the bedroom, completely open without any walls around them. A walk-in suite containing a separate toilet space, two sinks and a closet-lined alcove, however, was afforded privacy. The designers kept the wash closet in the same place but gutted the partitions and doors cordoning off the vanity and wardrobe areas. Meanwhile, a new walk-in closet was built in place of the old shower and tub.

With the suite now clear, the team extended the double vanity by 25 inches, all the way to the back wall, and reserved the alcove space for a new wet room. To achieve the neutral and calm environment the clients desired, the designers laid a warm limestone tile floor and installed a white-oak vanity with a light quartz countertop, tying the piece back to the new kitchen island.
For the wet room, they specified the same beige limestone for the floor but in a herringbone mosaic format that enhances safety. Large Calacatta-evoking porcelain tiles clad this room’s walls, a built-in bench is situated on the shower side, and a freestanding tub sits opposite the bench. Enclosed by a frameless glass wall and door, the wet room still possesses an airy and open feel – without the prying eyes.
Sources
Design: Emily Ruff, Owner & Principal Designer, Cohesively Curated Photography: Carina Skrobecki Photo KITCHEN Appliances: Thermador & Wolf Cabinetry: Superior Cabinets Countertops: Stratus Surfaces Faucets & Sinks: Brizo Flooring: Riverwood Floors Hardware & Sconces: Rejuvenation Pendants: Lostine Tile: Riad Tile PRIMARY BATH Cabinetry: Superior Cabinets Faucets & Shower Fixtures: Brizo Floor Tile: Stone Center Hardware, Mirrors & Sconces: Rejuvenation Shower Walls: Bedrosians Sinks: Kohler Tub: American Standard


